

For the longest time, our dining room just wasn’t working for us.
It looked fine… but functionally? We were constantly running out of storage. Between hosting, kids’ items, and everyday overflow, we needed a solution that was both practical and beautiful.
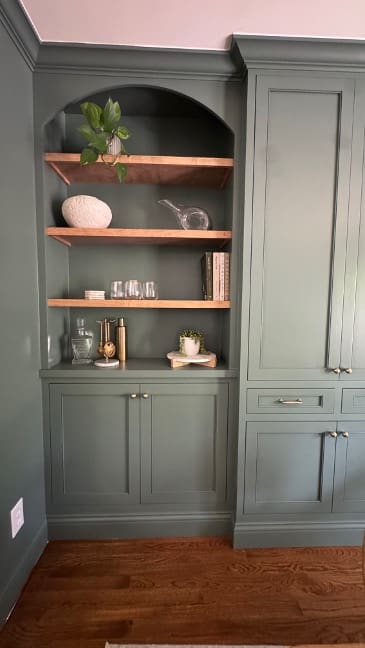
So we decided to completely transform the space with custom floor-to-ceiling built-ins—and I can confidently say this is one of the most impactful projects we’ve done in our home.
Today I’m walking you through the full process, what we used, and everything we learned along the way.
Before: Why We Decided to Renovate
Our dining room had existing wainscoting from the previous homeowners. While it added some character, it didn’t serve any real purpose for us—and more importantly, it didn’t provide the storage we desperately needed.
We wanted:
- More closed storage
- A high-end, custom look
- Something that felt built into the home—not added on
Step 1: Demo the Existing Wainscoting
The first step was removing the wainscoting to give ourselves a clean slate.
This part was pretty straightforward:
- Carefully pry off trim and panels
- Patch any major damage
- Prep for skim coating later
Tip: Take your time here—less wall damage = less work later.
Step 2: Build the Cabinet Boxes + Face Frames
While I handled demo, Noah got started building the cabinet boxes and face frames.
We went with:
- Plywood boxes for strength and durability
- Custom face frames to give that high-end, built-in look
Everything was built off-site (in our workspace), then assembled and installed in the dining room.
Step 3: Install Floor-to-Ceiling Built-Ins
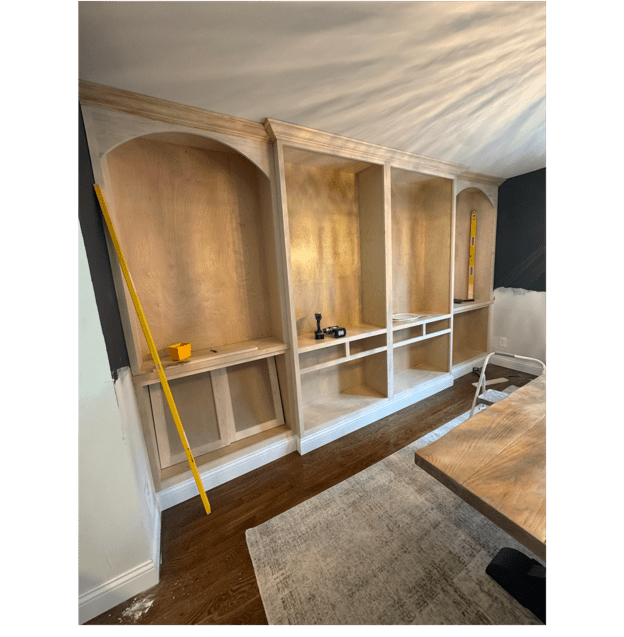
Once everything was built, it was time to install.
We:
- Leveled and secured the base cabinets
- Stacked and anchored upper sections
- Attached everything directly to wall studs
This is where the transformation really started to take shape.
Our goal was to make these feel like they had always been part of the home.
Step 4: Skim Coat + Trim Work
After install, we focused on blending everything seamlessly.
We:
- Skim-coated the walls where the wainscoting had been
- Caulked and filled all seams
- Installed crown molding throughout the room and on the built-ins
This step is what takes built-ins from “DIY project” to custom, high-end finish.
Step 5: Paint for a Moody, Built-In Look
We knew we wanted this space to feel:
- Moody
- Cozy
- Elevated
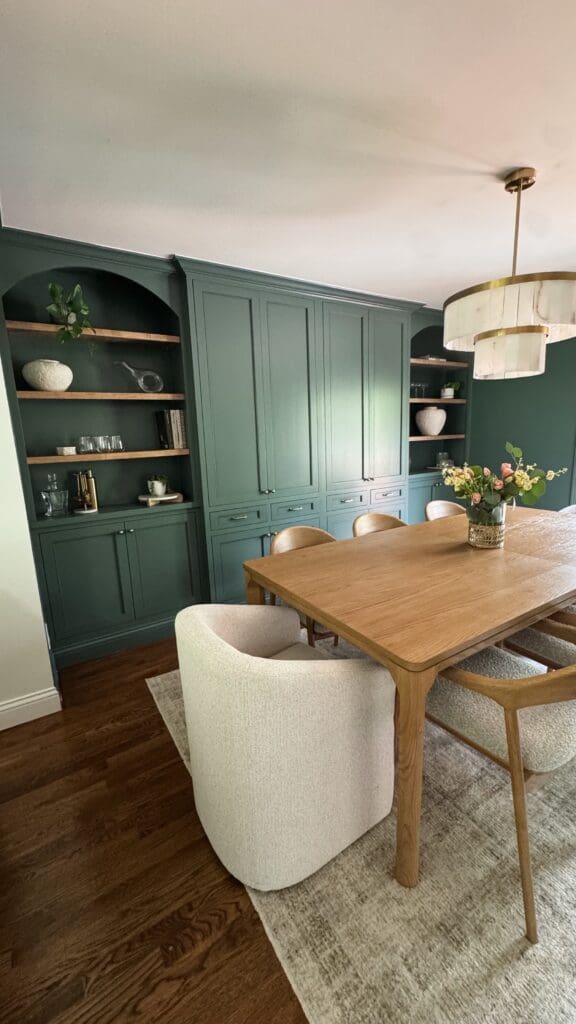
So we painted the built-ins the same color as the walls, which helped them blend in and feel like an architectural feature—almost like a statement accent wall. The color we went with was succulent by Sherwin Williams.
Step 6: Install Hardware (The Finishing Touch)
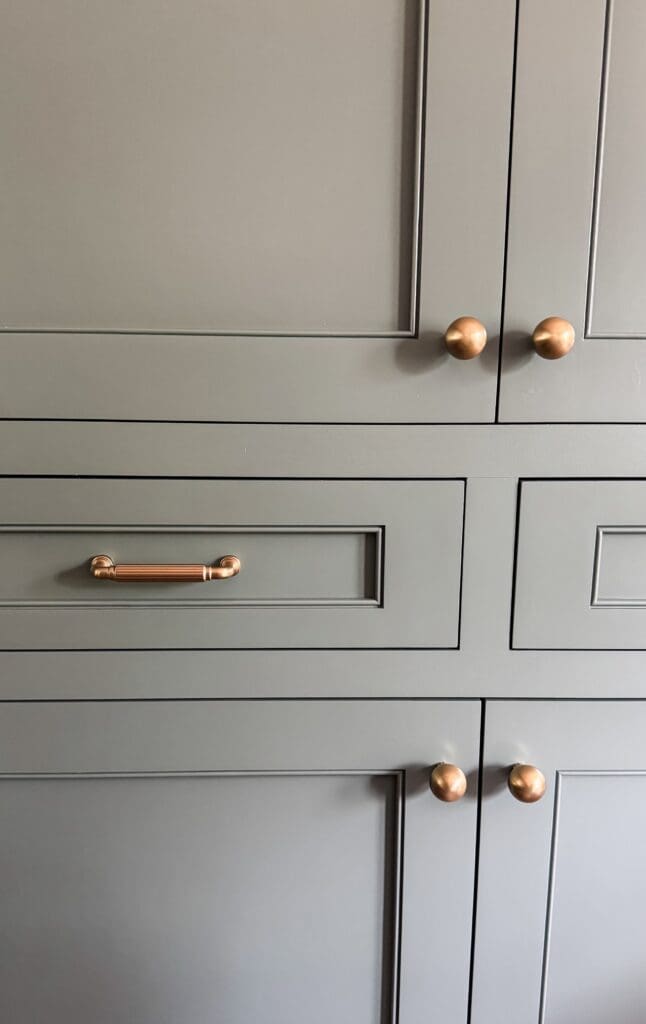
The final step—and honestly my favorite—was adding hardware.
We used pieces from Amerock, and they completely elevated the look. The detailing is subtle but makes such a big impact.
This is one of those finishing touches that takes the project from good to designer-level.
The Final Result
This room is now:
- Functional (finally enough storage )
- Visually impactful
- One of our favorite spaces in the house
And the best part? It truly feels custom to our home.
Full Materials List
Here’s everything we used for this project:
Cabinet Build
- 3/4” plywood (cabinet boxes)
- 1×2 and 1×3 boards (face frames)
- Wood glue
- Finish nails (brad nails + framing nails)
- Cabinet screws
- Shims (for leveling)
Installation
- Stud finder
- Level
- Drill/driver
- Anchoring screws (into studs)
Wall + Trim Work
- Joint compound (for skim coating)
- Sanding blocks/sponges
- Caulk
- Crown molding
- Trim pieces (for finishing edges)
Paint + Finishes
- Primer
- Interior paint (wall + built-ins color match)
- Paint sprayer or roller/brush setup
Hardware
- Cabinet pulls/knobs from Amerock
What We’d Do Again (And Differently)
Do again:
- Floor-to-ceiling height (makes the room feel bigger)
- Painting everything the same color
- Investing in good hardware
Might tweak:
- Add interior lighting to cabinets
- Pre-plan more hidden outlets inside
Final Thoughts
If you’ve been considering built-ins—this is your sign to go for it.
Not only did this completely transform how our dining room looks, but it also made it so much more livable for our day-to-day life.
If you have questions, drop them below or message us—we’re always happy to help.


