

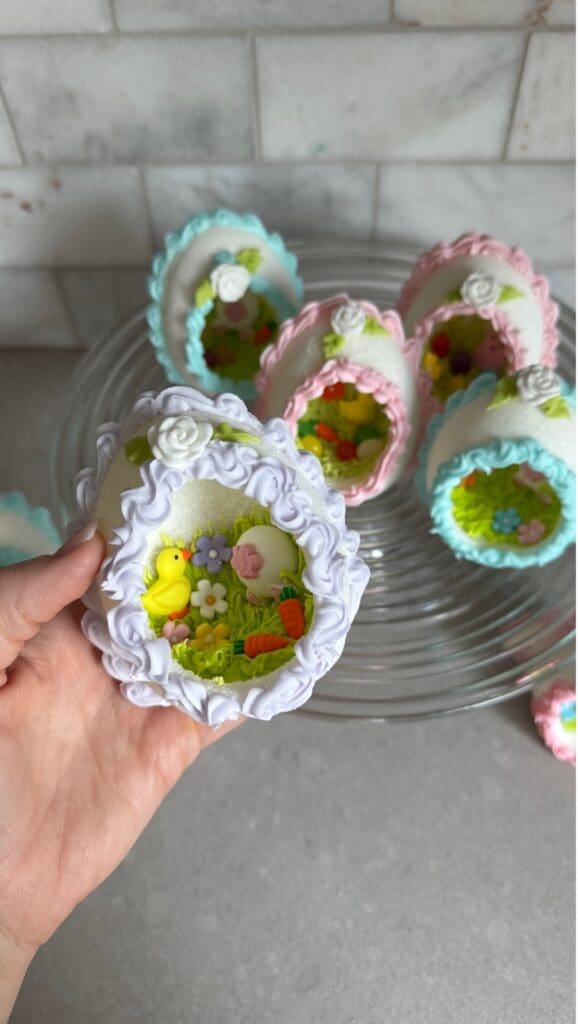
Every year around Easter, I see the most beautiful panoramic sugar eggs—those delicate, hollow eggs with tiny spring scenes inside—and they instantly take me back.
One of my core childhood memories is receiving these in my Easter basket from my mom. I remember thinking they were the most magical thing… like a tiny little world hidden inside an egg.
This year, I went searching for them to recreate that same feeling for my own family—but I couldn’t find them anywhere locally. And when I looked online, I was shocked at how expensive they were to have shipped.
So instead… I decided to try making them myself.
And honestly? I’m so glad I did.
Not only was it way more affordable, but it turned into such a fun, nostalgic project that I’ll definitely be doing again.
So if you’ve been wanting to try these, I’m breaking down exactly how to make your own step-by-step.
Supplies You’ll Need
- Granulated sugar
- Meringue powder
- Water
- Egg mold
- Royal icing
- Piping bag + piping tips
- Oval cookie cutter
- Spatula
- Cardboard (for transferring eggs)
- Small sugar decorations (bunnies, ducks, carrots, flowers, etc.)
- Carrots and bunnies
- Chicks and Bunnies
- Carrots, Bunnies and Eggs
- Flowers
- Jelly beans
Ingredients
- 5 cups granulated sugar
- 5 teaspoons meringue powder
- 6 teaspoons water
Step 1: Make the Sugar Mixture
Start by adding your sugar and meringue powder to a bowl. Mix it well with your hands so everything is evenly combined.
Then add the water and mix again until the texture feels like damp sand—it should hold its shape when pressed together.
Step 2: Mold the Eggs
Firmly press the sugar mixture into your egg mold, making sure it’s packed tightly.
- Use a spatula to level off the top
- Flip the mold onto a piece of cardboard
- Carefully remove the mold
Once removed, use your spatula to trim a small amount off the bottom so the egg will sit flat.
Step 3: Create the Window
On one half of the egg, gently press an oval cookie cutter into the front to create the classic “window” look.
Leave the second half solid—this will be the back of your egg.
Step 4: Bake
Place both halves (on the cardboard) onto a baking sheet.
Bake at:
- 175°F for 10 minutes, or
- 150°F for 15 minutes
This helps set the outer shell while keeping the inside soft enough to hollow out.
Step 5: Hollow the Eggs
Once baked:
- Use a knife to carefully score around the oval window
- Pop out the center
- Use a spoon to scoop out the soft sugar inside
- Gently smooth the interior with your fingers
Repeat the hollowing process on the back half (from the flat side).
At this point, your eggs should be hollow and fit together nicely.
Step 6: Decorate the Inside
This is the fun part—and where you can get really creative.
Here’s what I did:
- Piped green royal icing using a grass tip for the base
- Added flower stems with icing
- Placed small royal icing flowers on top
- Added decorations like bunnies, ducks, carrots, and jelly beans
You’re basically creating a tiny Easter scene inside your egg.
Step 7: Assemble the Egg
To put it all together:
- Pipe royal icing along the edge of the back half
- Place the front (window) half on top
- Pipe additional icing around the seam to secure
Then decorate the outside by:
- Piping along the window edge
- Adding decorative details along the seam
Step 8: Let It Harden
Allow everything to fully harden before handling or displaying.
Once set, you’ll have your very own panoramic sugar egg—a beautiful, handmade Easter piece that looks just as special as the store-bought ones (if not better).
Final Thoughts
I honestly didn’t expect to love this project as much as I did. It’s one of those DIYs that feels a little old-fashioned in the best way—and it’s something you can bring out year after year.
Plus, if you’ve been seeing these online and thinking “why are these so expensive?”… now you know—you can absolutely make your own.


