

When renovating Reese’s playhouse I knew I wanted to add a kitchen set inside for her. However, the goal of the playhouse renovation was to use leftover material and do it at as low of a cost as possible!

If you have done any research on play kitchen sets you know the prices can vary tremendously. Pottery Barn ones can go anywhere from $600-$2,000 and look better than my own kitchen where Amazon ones can be $80-$150 but aren’t the most aesthetically pleasing. Thankfully we scored a free one from Noah’s cousin who was getting rid of one, however it didn’t have the look I was going for on Reese’s playhouse. I wanted Reese’s playhouse to feel completely different than the rest of our home. Most of our house is neutral with a few pops of color but I really wanted the playhouse to be bright, in your face colors from the moment you entered it. So, my goal was to make her new kitchen set feel just like that! Let me walk you through how I did that!
Supplies needed:
- Play kitchen set
- Foam roller
- Paint brush
- Gold spray paint
- Drill
- Paint (I used a turquoise, purple, pink and white)
- ¼ inch plywood
- Stencil
- Primer
- Sander or sandpaper
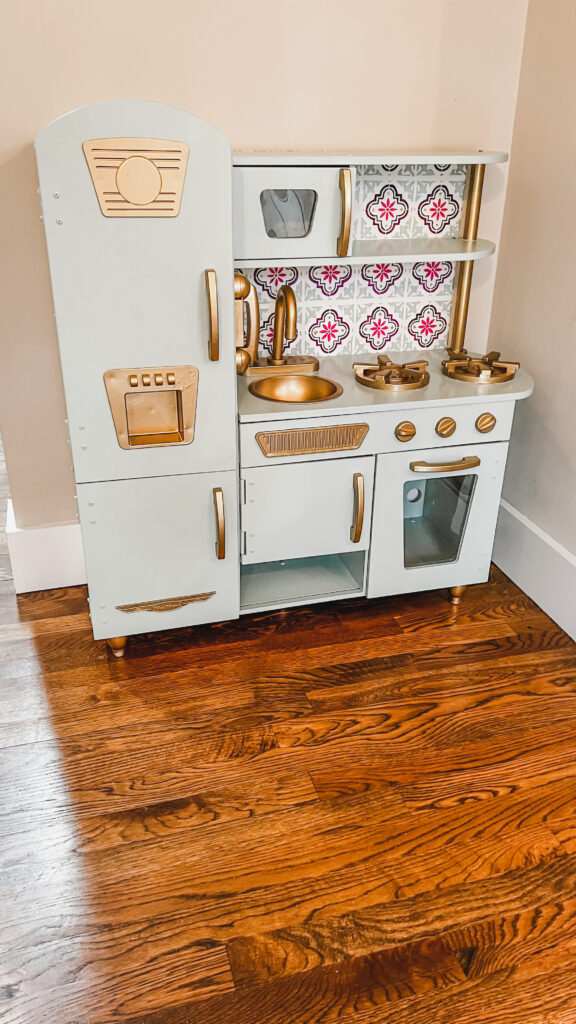
The first thing I did was clean the kitchen set with warm soapy water to remove any dirt or grime. I then lightly sanded the whole play set with 150 grit sandpaper this helps the bonding primer to adhere better. After sanding, I then spray painted any areas that were silver to be gold. This was just my preference. Some pieces that I wanted to be gold were able to be removed with a drill, so I removed those to make spray painting them easier. This also made painting the kitchen set easier as well, so I didn’t have to work around them.
After the spray paint was dry. I applied a coating of a bonding primer. This will help prevent the kitchen set from chipping. I applied 2 coats, but one coat could have probably been enough. I then was able to start painting the kitchen set the turquoise color I had picked out. The sheen was satin, but you can use whatever sheen your prefer. I found it easier to use a paint brush in the areas where my foam roller wouldn’t fit otherwise, I used my foam roller for a better finish. After I had applied 2 coats of paint, I could then screw back on any pieces I had removed that were not spray painted gold.
Lastly, I added some faux backsplash behind the kitchen set shelves. We had some ¼ plywood that we found in our garage and cut it to the size we needed. I painted it with 2 coats of a flat white paint before stenciling it to look like backsplash. The stencil I ordered was from Amazon. I had some leftover acrylic paint I used, but any type of paint would work. I found taping my stencil in place and then using a small sponge to apply each color was the easiest way to apply.
After the stencil was completely dried, we then screwed it onto the back of our playset. And that’s it! I love how it turned out! It’s better than I imagined and cost us nearly nothing!
Watch this quick video to see it all come together!


