

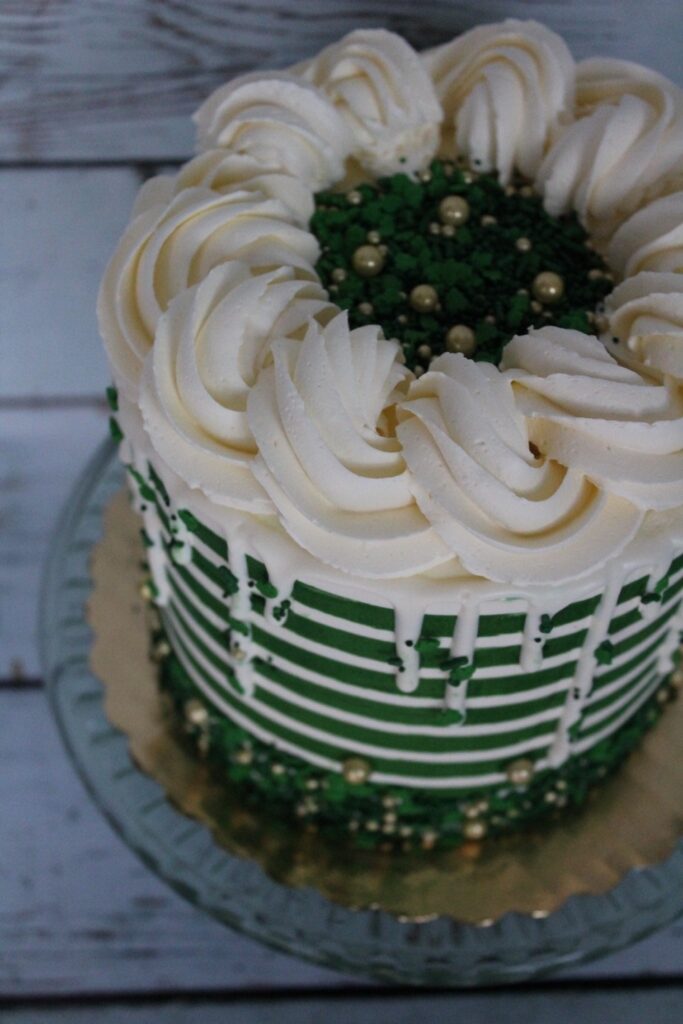
Whether you celebrate Saint Patrick’s Day or not, this cake design is perfect for any event. Swap out the colors to fit whatever theme you need! I love the simple striped design with chocolate drizzle tops and buttercream swirls. Let me walk you through all that you’ll need to create this design for yourself.
Supplies needed
- Piping bag tips
- Food coloring
- Sprinkles
- Kitchen aid
- Scale
- Cake boards
- Acrylic cake disc
This all-in-one kit has a lot of materials you’ll need for a great price.
As for the flavor of this cake, I made a simple vanilla cake topped with vanilla buttercream. However, I recommend visiting my previous blog posts if you want to make it a little more festive for Saint Patrick’s day. Both would be great options.
If you want to keep it simple, follow my recipe for making my vanilla buttercream.
For the cake itself, feel free to follow any vanilla buttercream recipe or your standard box cake. Whichever is easiest for you! However, to achieve this same cake design look, you must bake your cake in 3 six-inch pans. This will create the same height as shown with my Saint Patrick’s Day cake.
Once your cakes are baked and cooled, trick the round tops off each 6-inch layer.
Now it’s time to start decorating that St Patrick’s Day cake you’ll love!
When decorating any cake, I typically use acrylic cake discs to ensure my cakes are even and level. So that is the method I will be walking you through today.
Acrylic cake discs are a handy tool for icing cakes. They are flat, round discs made of clear, food-grade acrylic placed on top of a cake to help create a smooth, even layer of frosting or icing.
Step 1: Prepare Your Cake.
Before you begin icing your cake with an acrylic disc, make sure your cake is prepared and ready to be frosted. You should have already baked and cooled your cake and leveled it if necessary. Giving your cake a crumb coat, a thin layer of frosting that helps prevent crumbs from getting into your final layer, is also a good idea. I prefer to put my cake in the fridge for at least one hour after applying a crumb coat to set up the buttercream.
Step 2: Choose the Right Size Disc.
Acrylic cake discs come in various sizes, so choosing the right size for your cake is essential. The disc should be slightly larger than the diameter of your cake —this way, the buttercream can build up around the edges.
Step 3: Apply a Thin Layer of Frosting.
Once you have removed your cake from the fridge, place the acrylic disc on top of your cake, centered as best as possible. Apply a thin layer of frosting on the disc, spreading it to the edges with an offset spatula or cake scraper. This layer of frosting will help the disc stick to the cake and prevent it from sliding around while you frost.
Step 4: Frost Your Cake
Now it’s time to frost your cake! Apply a generous layer of frosting to the edges of your cake. Use an offset spatula or cake scraper to smooth out the frosting as much as possible. I usually apply a coat of icing, place it into the fridge, and repeat it at least twice to ensure my cake is evenly iced.
Step 5: Remove the Disc
Once you’ve finished frosting the cake to your liking, carefully remove the acrylic disc by sliding a knife under it and then removing it. You should have a smooth, even layer of frosting on your cake. If you aren’t, apply a thin layer of icing to the top.
Step 6: Now comes the fun part – creating the stripes!
Take your grooved cake scraper and hold it at a slight angle to the side of the cake. Drag the scraper across the buttercream, and create grooves or stripes in the frosting. Repeat this process until you have created stripes all around the cake.
Step 7: Pipe in the buttercream color of your choice.
After creating the stripes, you will then need to mix whatever color of buttercream you would like your lines to be. I went dark green, as shown with my Saint Patrick’s Day cake. Once you mix your buttercream, place it into a piping bag and cut a small hole to pipe between each stripe groove on your cake. Once you have piped between each stripe, you can smooth
out the buttercream by using a flat spatula or bench scraper. Hold the tool perpendicular to the side of the cake and slowly rotate the cake as you smooth the buttercream. This will help to create an even surface and remove any air pockets.
Step 8: Add Finishing Touches
Finally, you can add any finishing touches to the cake. I added a white chocolate gauche drip to the outside of my cake. Then melted some white chocolate and added a bit of heavy whipping cream to make it a little runnier and more manageable when creating my chocolate drip. I then placed it into a piping bag and drizzled it on the top of my cake, letting it run down the sides. I then applied a thin layer to the top of the cake. After that, I piped some buttercream swirls to the top of the cake using a star tip and then topped it with some fun festive sprinkles.
Visuals are sometimes the easiest to follow, so here is a full video on the process. Hopefully, this gave you all the tools, tips, and confidence you need to create your striped buttercream cake!


